At Ejaro, we have been transitioning to React Native over the past two years while continuing to build new features and growing our app. Instead of undertaking a complete rewrite from scratch, we adopted a hybrid approach. This strategy has been successfully implemented by companies like Shopify and others. In this post I go over some of the decision taking approaches, challenges, and solutions we implemented.
Why Move to React Native?
In essence, the decision is about efficiency in time and effort, better resource allocation, streamlined hiring processes, cost savings, accelerated development speed and productivity.
As the backlog grows, teams find themselves building more features and addressing more issues, the codebase becomes cluttered with duct tape fixes, and “necessary” refactoring is continuously postponed, implementing new features, debugging issues, and deploying fixes all start to get harder and take longer time to do. This leads to increasing frustration among both developers and leadership. Efforts are often directed towards better prioritization, organizational improvements, and hiring to meet the growing demand. While maintaining multiple codebases for the same application is far from ideal, it often goes unchallenged. Transitioning from native development is perceived as a massive project, typically thought of as a complete rebuild, which can be dismissed as just another “refactor” project. Limited resources further exacerbate this issue, leading to the project being quickly set aside due to its seemingly low ROI, especially when considering that a full rebuild will likely take years, pulling team members away from more important tasks, working in the dark without delivering any tangible results, also often requiring a feature freeze to have a good outcome, risking an a never ending rebuild project otherwise.
However, in the long run, for the majority of applications, maintaining a single cross-platform codebase with current tech is almost always a better position to be in. Keeping in mind that we can still drop to native wherever necessary. It automatically enhances various aspects, some of which:
- Faster iterations, bug fixes, and feature releases can reach users immediately through OTA updates.
- Lower development and maintenance costs.
- Easier management for monitoring and logging across technical, marketing metrics, and UX/UI tracking.
- Easier A/B testing processes.
- Can have a smaller team, and can leveraging web and full-stack developers.
- When planned, a significant portion of the codebase can be shared with web.
Full Rewrite vs. Gradual Migration
Opting for a full rewrite can be advantageous if there are sufficient resources, and a feature freeze is a possiblity. It’s easier to think about, plan, and execute. But, understandbly many companies cannot afford to take this route. A gradual transition from native to React Native offers a more balanced solution. By integrating React Native with existing native code, we can progressively migrate to React Native over time. This involves maintaining the native codebase while incrementally replacing one screen, view, or flow at a time, then delivering that to production quickly. Simultaneously, any new features can be developed in React Native until the entire application is fully transitioned.
Compared to a full rewrite, a gradual migration will get new React Native code in the hands of real users sooner, enabling us to identify and address issues, and solutions earlier in the process. It also integrates the rebuild as part of the regular development cycle, allowing continuous iteration as we migrate. It avoids the chaos of a complete overhaul and lets us manage changes more smoothly, avoiding ending up shipping a tangled mess of code that is probably out of sync with the requirements by the time it’s completed.
I reached out to the awesome folks at Infinite Red and they shared many great points, some take aways about making this decision:
- Size and Value of the App: For large, high-value applications, a gradual migration is often the best approach. It allows for a smooth transition without disrupting the entire system. Smaller apps might benefit more from a complete rewrite, which can be faster and involve fewer complications.
- Team and Resource Management: Successful migration requires the right team structure and adequate resources. You need to think about your current team ability, comfortability and expertise with native and react native, and to think about wether you will hire more engineers for the project or not. They also found that teams that were discplined with their feature freezs during full rewrite migrations were more successful in the process.
- Handling Complexities: Migrating a large app requires careful planning and incremental changes. Gradual migration is likely to be more complex and have more issues.
Overall, the right approach depends on your app’s complexity, the resources available, and the importance of maintaining stability during the transition. Gradual migration might be generally safer for larger, more complex apps, while a full rewrite might be suitable for smaller projects with fewer dependencies.
How Does It Work
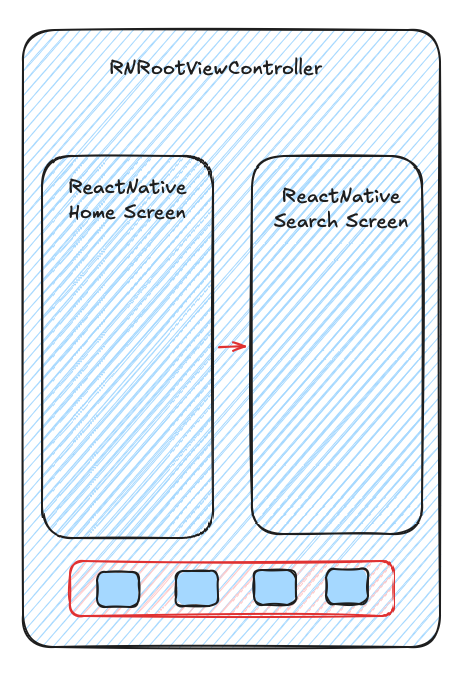
React Native supplies the essential native primitives—such as ViewController on iOS, Fragment, Activity on Android —to load and render RN’s JavaScript bundle. This allows us to integrate a React Native root view controller into the existing native navigation stack. The end goal is to have a navigation stack that seamlessly accommodates both React Native and native screens. For instance, in a simplified rentals application it might look like the following:

However, depending on how the code and navigation are structured. This will introduce various complexities and challenges to tackle.
Setup
Many React Native startes and boilerplates conveniently include both Android and iOS projects setup/folders, providing an excellent foundation to begin with. We found that Expo is a little harder to get setup into an existing app compared to bare React Native.
Getting React Native into an existing codebase can be a tedious process depending on the age and structure of the existing codebase. But, with determination, tens of rebuilds, cache invalidations, and node_modules deletions. The app will eventually, hopefully, start running.
Here’s how we approached it:
-
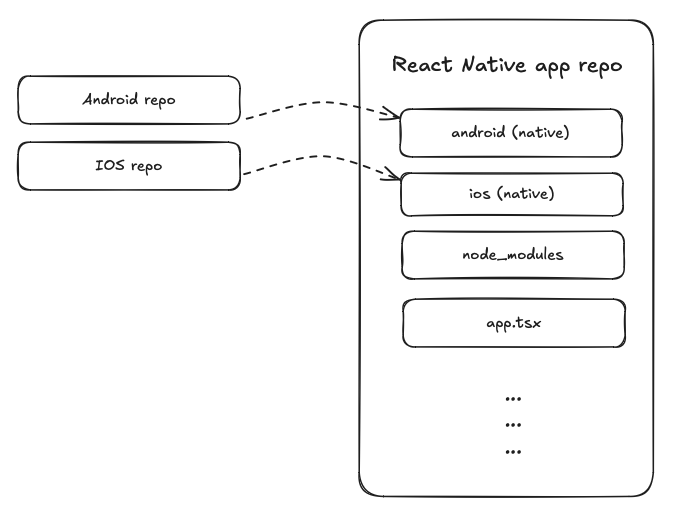
Combining Repositories: We started by copying our separate Android and iOS repositories and removing any Git-related files. Then, we embedded them into a new React Native app repository by replacing the existing
androidandiosfolders. -
Adding Dependencies and Configurations: Step by step, we modified the projects to include the necessary React Native pods, merging the podfiles, packages, and configurations. At this stage, we didn’t add any functionality through React Native app code. Our main goal was to ensure that both the Android and iOS projects had all the required dependencies and setup from React Native while running normally without any issues or degradations.
- Laying the Ground Work: Once the setup was working, we began implementing classes responsible for handling navigation, state sharing, and other bridge methods that we’ll discuss later. Importantly, we didn’t replace the native app entry points with React Native at this point. Instead, we kept that native and only initialized the React Native bundle to be used later in the migration process.
Navigation
One of the initial challenges we encountered is how React Native manages navigation. While our goal is to achieve the seamless stack described earlier, React Native maintains its own navigation stack, which typically appears more like the stack below in which a shared instance of React Native root view controller holds your react app.
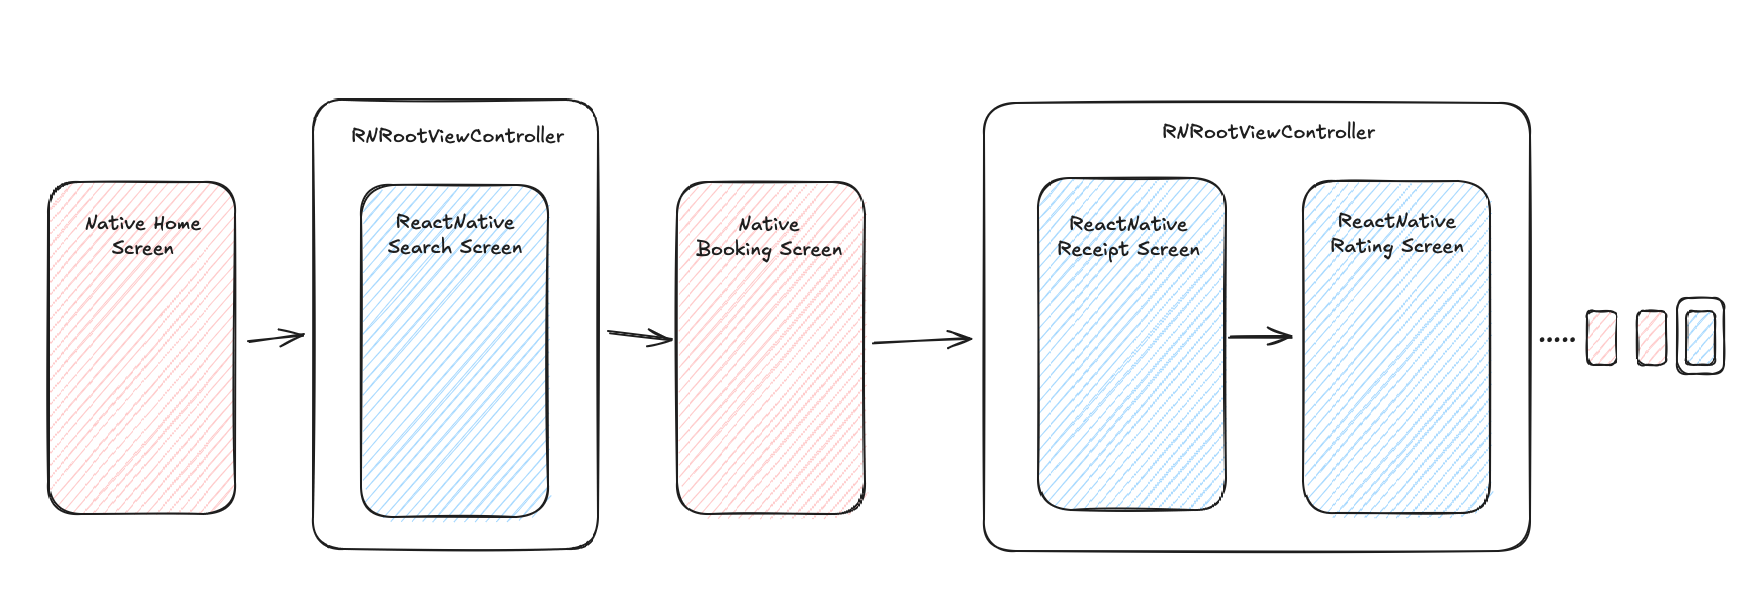
For instance, consider you have somehow reached the Receipt screen while managing your navigation stack with React Navigation.
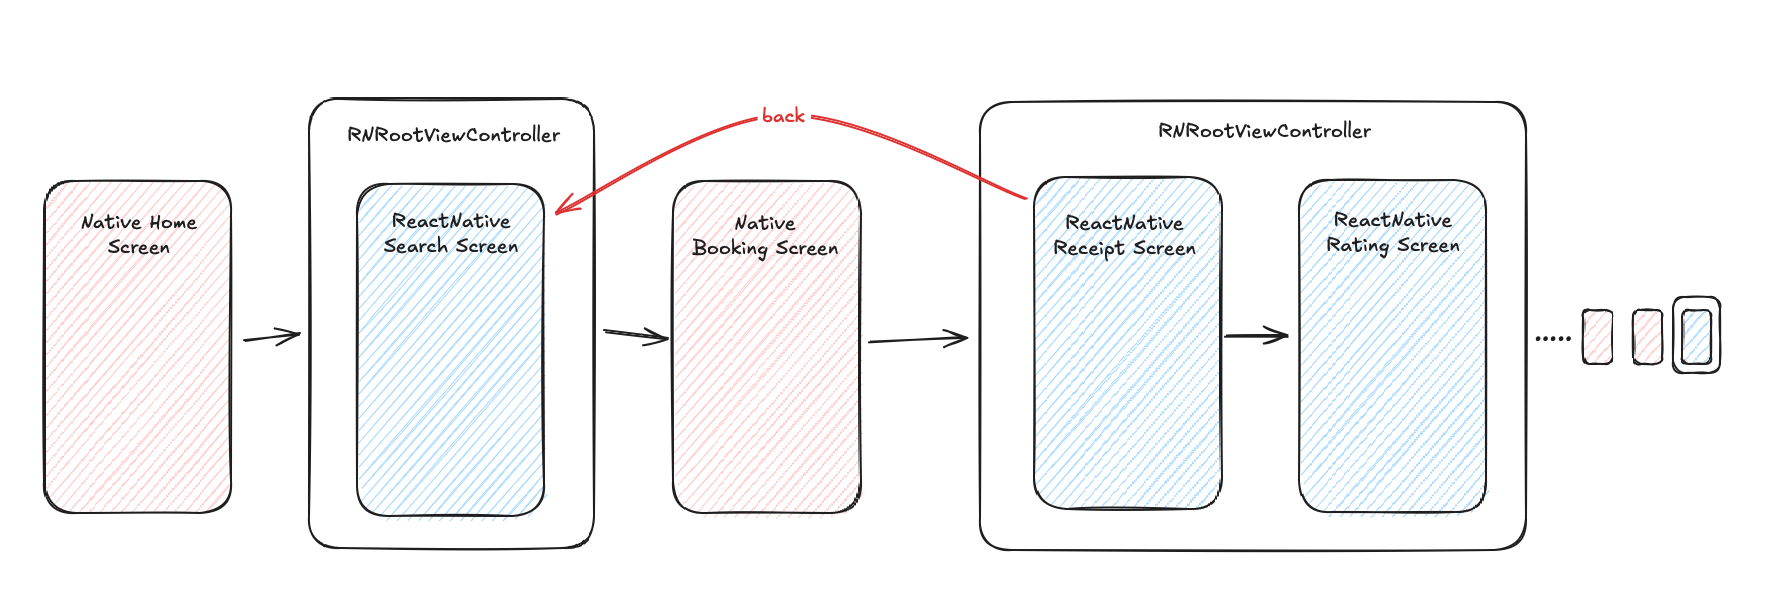
When the user attempts to go back, the shared RNRootViewController rendering your react app does not know anything about the state of the native navigation stack. Consequently, it navigates back to the search screen instead of the intended previous screen. This occurs because React Native’s controller operates within its own navigation context, unaware of the native view controllers.
One potential approach is to instantiate a new RNRootViewController or reset React Native’s navigation stack each time a navigation crosses the React Native <-> native boundary.
However, other than the overhead of creating a new container with every transition—which might be an acceptable overhead until the app is fully migrated to React Native—there is an additional issue. From the Receipt screen’s perspective, there are no previous screens to navigate back to. It’s the first thing in the stack.
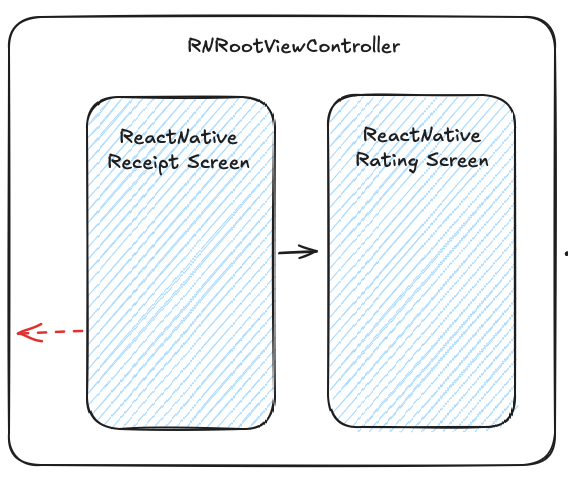
A straightforward solution is to leverage React Native-to-native bridges. By implementing a unified “go back” method within React Native, we can ensure that if there are no screens to navigate back to in React Native’s stack, the method delegates the navigation control back to the native layer. This allows the navigation controller in native to handle the navigation, returning to the previous native screen seamlessly if there is any.
Other options, such as Wix’s React Native Navigation are also available. However, we found that this solution only works effectively if the app’s native architecture is already structured in alignment with the framework’s design. If the native codebase doesn’t fit, it is generally more advantageous to manage navigation through a custom implementation. I think that the available native navigation packages are beneficial for new applications that are designed from the beginning with a hybrid future in mind, not for a brownfield app being converted to hybrid. Folks at Infinite Red, also shared some great tips on handling navigation between native and React Native parts of the app. They mentioned that navigation was indeed one of the main challenges in similar projects they worked on. To make it smoother, they suggest thinking about and building the navigation stack so that it moves from native to native to React Native, instead of mixing it up like native > RN > native. Thinking of navigation in terms of user flows rather than single screens to minimze crossing the boundary and thus lowering navigation complexity. This will lead to some screens/flows taking longer to release, as other related screens need to be completed and packaged first as a complete flow.

Keeping related screens together makes the flow feel more natural and easier to handle. We’ve done somthing similar at Ejaro which have definitely made handling navigation less of a hassle. They also recommend starting small by migrating the most static screens first—those that don’t rely heavily on native modules. This way, the focus can be on getting the navigation right without getting bogged down by other complexities.
As more screens get transitioned, eventually we needed to update our Home Screens. We use a native bottom tab bar navigator, which initially looked like this:

We found it’s best to keep the tab bar in native until the very end. Once all of the screens are transitioned to React Native, we switched the tab bar to React Native as well. The team at Infinite.red also agrees with this strategy.
Navigation here can follow four main paths:
- React Native to Native
- Native to React Native
- Native to Native
- React Native to React Native
Paths 3 and 4 are generally straightforward. Nothing needs to be changed on either native or react native side. However, paths 1 and 2 can be a bit tricky because screens often rely on specific states or parameters to function correctly. For example, in the rentals app, you might need a rental id, dates, or other important details to be passed to a rental summary screen.
To tackle the first scenario—navigating from React Native to native—we decided to transition screens in a way that minimizes cases where we have to take this path (1). Then implemented a bridge method that handles each screen manually for cases where we needed it. This approach ensures that each transition is managed properly.
func navigate(screenIdentifier: String, data: [String: Any], ....)
I didn’t have enough time to fully explore other approaches. However, I started initial work on a package to handle hybrid navigation seamlessly. The main idea is was decorate or extend any native
ViewController,Fragment, orActivityto make them accessible from React Native. By using a code generator (e.g Sourcery for Swift) to automate the routing and parameter passing required for each screen. I might release this package later if I ever get to back to completing it.
The second navigation path—moving from native to React Native—is naturally more common, since the app is already built entirely in native. We were comfortable with the overhead of creating a new container for each screen, as we found that it had negligible impact on performance and responsiveness.
To handle this transition smoothly, we implemented our React app’s entry point logic using React Navigation with a setup that allows us to accept initial parameters, including the target screen and other state details. These parameters are passed during the creation of the RCTRootView by setting them as initialProperties on the native side.
const AppStack = ({
  initialRoute,
  initialState,
}: {
  initialRoute?: keyof AppStackParamList
  initialState?: InitialStateProps
}) => {
  /**
   *
   * State changes with navigational effects can be observed here
   */

  /**
   * InitialRoute and InitialState here come from the native side when a component is requested with initialProps
   * This allows selecting which screen to show without registering all of them, thus keeping the stack navigation intact
   * This also passes the data to the screen through initialParams
   */
  return (
    <Stack.Navigator
      screenOptions={{
        headerShown: false,
        fullScreenGestureEnabled: true,
        customAnimationOnGesture: true,
      }}
      initialRouteName={initialRoute}>
      <Stack.Screen name="Index" initialParams={{...initialState}} component={BottomTabs} />
      ...
      ...
      ...
Deep linking is another crucial part of our app. We decided to continue managing deep links on the native side since now we need to direct users to either native or React Native screens. By using the same setup, we navigate using a manual check. and trigger the navigation for react native side entry point to handle. We make sure that the React Native bundle is ready before that.
As we began transitioning some of our home screens—those managed by the native tab bar navigator—we ran into a few issues which we think can be common in this process:
-
Eager Loading of Tab Screens: On iOS, the tab bar navigator eagerly loads each tab’s
RCTRootView. This can cause some unwanted side effects by rendering each tab screen in the background.To tackle this, we explored a few different approaches:
- Disabling Eager Loading: We thought about turning off eager loading and creating the container only when navigating to each tab. While this reduces unnecessary background rendering, it comes with its own set of problems. We end up losing the previous state, such as scroll position, and filled fields whenever users switch between tabs. Plus, it triggers a full re-render every time, which isn’t ideal.
- Managing Background Rendering: Another option we considered was anticipating and designing for background rendering on the React Native side. But this also is not ideal.
- Using View/Activity Life Cycle events: This involves setting up the right triggers and managing view lifecycle events between the native and React Native root view controllers along with disabling eager loading. However, this time keeping the first created container instead of making a new one.
-
Persistent Native Tab Bar: We noticed that when navigating from a tab screen to another React Native screen within the same container, the native bottom tab bar stays visible across all screens. This creates a similar issue to before, where the React Native controller doesn’t have context about the native navigation stack.
On the search screen, the bottom tab bar shouldn’t be visible—it needs to be hidden. One option we considered was having the native side create a new React root view controller for the search screen and push it to the native navigation stack. However, this felt a bit convoluted since it involves switching back and forth between React Native and native layers.
Instead, we opted for a simpler solution. We created a list of screens where the bottom tab bar should be displayed, which is only the four main screens. Alongside this, we implemented a native method to control the visibility of the bottom bar. With this setup, when navigating within React Native, we check if the screen we’re moving to is on our list. If it is, we show the bottom bar; if not, we hide it by calling the bridge method.
-
Double Navigation Headers: On iOS, we used the built-in navigation header with some customizations. When adding headers in React Native screens and navigating from native, two headers would appear—one native and one React Native.
To fix this, we hid and showed the headers whenever we crossed the boundry between native and react native. This is done by using our existing navigation methods.
-
Infinite Nested Navigations: On both the native and React Native, the default behaviour when trying to navigate to the same screen or one that’s already in the stack is to not add a new instance, which is great. However, with our setup, navigating between Native > RN > Native > RN > Native could lead to multiple instances of the same screen being added to the stack. While we minimized this by planning our screen transitions in a flow-like manner, it can still happen. To solve this and a few other issues, such as showing a force update screen without duplication, we kept track of the currently displayed screen and whether it’s managed by native or React Native. This allowed us to manage the navigation behavior correctly and prevent unnecessary screen duplications.
-
Navigation Controllers: This wasn’t a concern on Android, but for iOS, we had to keep track of the last navigation controller used. This way, we knew which stack to push the
RCTRootViewonto when needed. This was a side effect of how our native codebase and navigation were structured, but it’s an important detail to mention. -
Modals, Present, Push, StartActivity, etc.: There are a few other nuances to handle since both iOS and Android have different types of navigations, like presenting a modal on iOS. We managed these similarly to our standard navigation by keeping track of the presentation method. This helped us properly dismiss modals using our bridged unified “go back” method.
It’s also a good idea to have a the RCTBridge instance be shared and reused in all RCTRootViews to avoid unnecessarily reloading the bundle. Along with initalizing an empty RCTRootView at native app start to avoid delays for first renders. We have a simple bundle init setup looking like this in IOS side with CodePush as our OTA updates provider.
private override init() {
  super.init()

  #if DEBUG
  	let jsBundleURL = RCTBundleURLProvider.sharedSettings().jsBundleURL(forBundleRoot: "index", fallbackExtension: nil)
  #else
  	let jsBundleURL = CodePush.bundleURL()
  #endif

  self.bridge = RCTBridge(bundleURL: jsBundleURL, moduleProvider: nil, launchOptions: nil)
}
Notifications
We’re already managing notifications on the native side—which we need to keep there—we also need to handle them in React Native. For example, this allows us to refresh a screen or perform other actions when a notification is received. We addressed this by emitting events from the native to React Native (React Native Communication) whenever we get a notification, with the goal of eventually moving all notification handling to React Native. Of course, this approach doesn’t give us full control over notification handling since we’re not directly influencing how notifications are managed. However, it serves as a temporary solution that meets our current use cases effectively.
Note: To save yourself time and frustration, always test notifications on physical devices. Simulators often have numerous issues and inconsistencies, regardless of what Apple and Google’s documentation suggests.
State Sharing
Starting with a native app means that all stored state resides in the native layer. This setup creates two separate places where the state can be modified. For example, if authentication is handled natively, the session is stored and used by the native API manager. However, any authenticated React Native screen isn’t aware of the native session, and vice versa. To address this, we need a shared state between the two sides.
There are several ways to approach this. We can use additional bridge methods or emit events to synchronize the state between native and React Native. This is the same strategy recommended by experts at Infinite.red. Since this is a critical part of our app and the interface between the two sides lacks static type checking or code generation (There is Nitro now), we suggest implementing strict runtime type checking using tools like Zod and adding tests to catch any issues early in development. Our goal is to eventually transition fully to React Native as more responsibilities shift there over time. Therefore, designing the state with this eventual move in mind is the approach we followed.
We also stored some of the state locally on the device for both native and React Native, using UserDefaults on iOS for example. For these states, we directly access and modify them with packages such as react-native-default-preference.
Extra
Android Activity vs Fragments
React Native documentation uses Activities as the primary method for integrating with existing applications. This approach is generally easier to implement and encounters fewer initial issues. However, it was harder to manage later on. The alternative is to use Fragments. Depending on the codebase, wrapping React fragments within a native activity might not be straightforward. Despite this, we found that using the Fragments greatly improved our workflow when embedding React screens in various parts of the native Android app, such as the bottom tab bar navigator.
RTL Issues
Our app supports both Arabic and English, with Arabic being a right-to-left (RTL) language. Getting RTL to work turned out to be quite challenging with this setup. We tried several solutions, but iOS wouldn’t change the RTL direction after rendering, and React Native seemed to have the same issue. In the end, we decided to have the native side update the RTL direction whenever the language changes and then reload the React Native bundle, effectively restarting the app.
Gestures and Swipe to Go Back
We needed to handle/override the native go back and swipe to go back events when navigating between native and React Native to makesure swiping works within React Native stack context, not to trigger a full RCTRootView to be swiped back unless the stack has nothing further to go back to.
Protected Screens
Depending on the setup, some authentication checks will need to be performed manually rather than being managed by the navigator itself. This wasn’t a big deal for us, as we mainly encountered it during the period when we had both native and React Native screens in the bottom tab bar at the same time.
Keyboad Avoid Issues
This isn’t specific to migration, but if you’re taking the hybrid route, you’re likely not using Expo from the start. That means you’ll need to handle keyboard avoiding views manually. This turned out to be a major challenge due to the differences in behavior between Android and iOS, especially with bottom sheets.
The only approach that worked for us was setting android:windowSoftInputMode="adjustPan" on our React container for Android and handling KeyboardAvoidingView behavior with:
Platform.OS === 'ios' ? 'padding' : undefined. Along with using keyboard show/hide events where necessary.
Another promising solution we haven’t explored yet is react-native-keyboard-controller. Additionally, Expo’sdocumentation on keyboard handling is a useful resource.
Timeline and Metrics
- Initial discussions & research: August 14, 2023
- First commit: Sep 25, 2023
- Major scaffolding and shell setup done: Sept 28, 2023
- First Internal build with React Native shipped for testing: October 28, 2023
- First build with React Native shipped to production: May 27, 2024
- Full migration to React Native: Feb 10, 2025
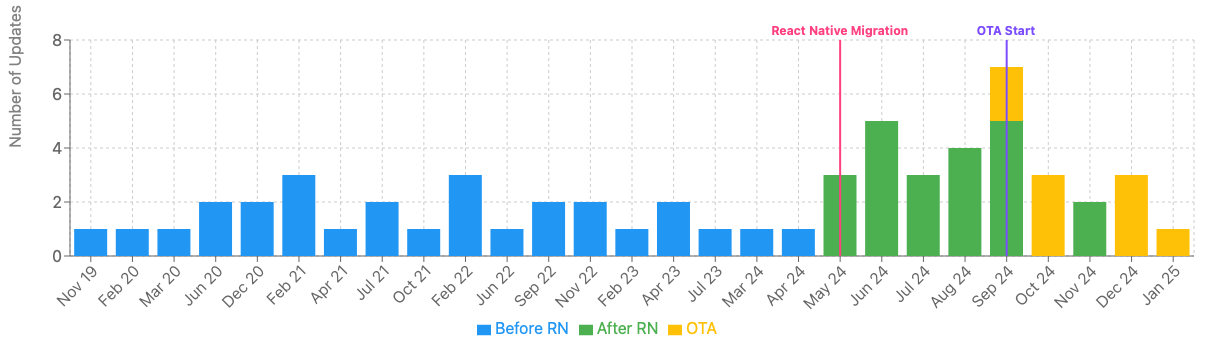
Frequency of releases before and after shipping React Native
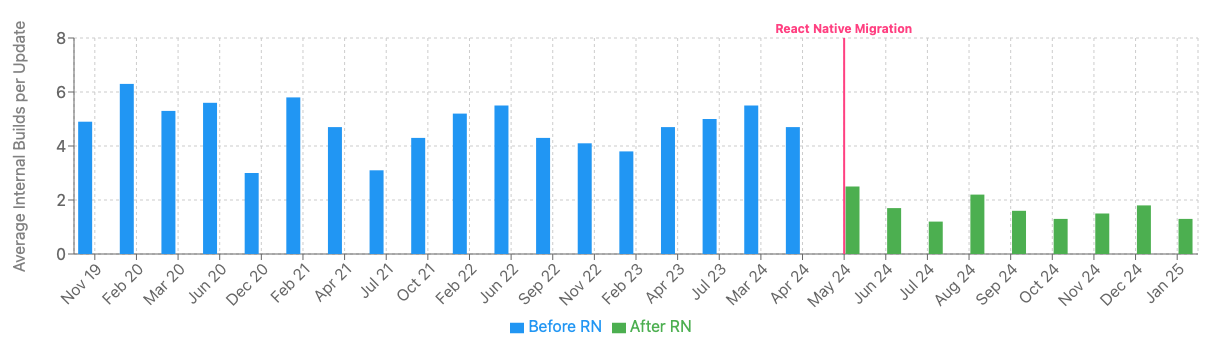
Number of internal builds sent for testing before and after shipping React Native
This serves as a useful metric that can indirectly reflect the amount of testing and rebuilding needed for native modifications compared to React Native, which tends to slow down the development cycle.
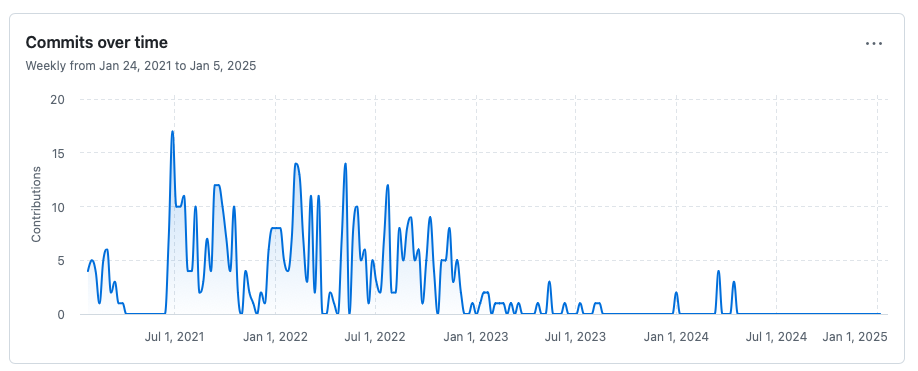
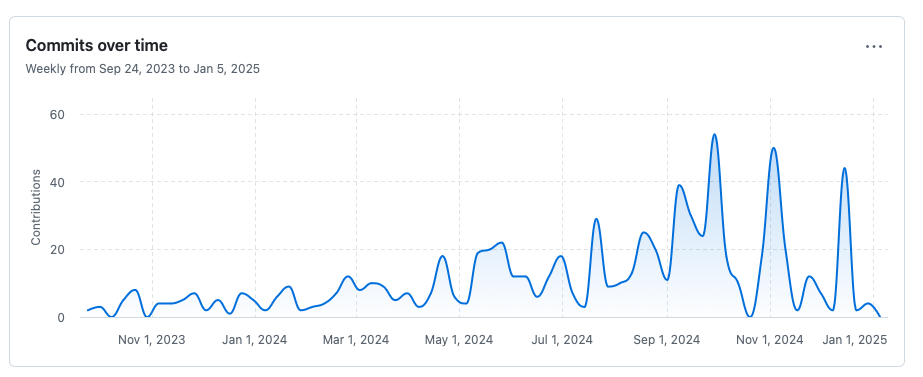
Contributions before and after shipping React Native
Both the number of team contributors to the app and the volume of additions have increased.
Areas for Improvement
You may notice that there was a considerable amount of time between our first commit and the first production release. However, this timeline and outcome was still better for us than completing a full rewrite. By our first react native code release, we had already released numerous internal builds to the team for testing. We had completed many major screens, flows, and many smaller ones, along with implementing state sharing, navigation, payments, monitoring, and other key aspects of the app. We believe this should and could have been accomplished much earlier, with smaller more frequent releases. However, the flows we initially chose to transition included numerous native modules and were not the most effective starting points for delivering this to users quickly. This shows how crucial it is to take the time to plan and research for a project like this. We recommend truly understanding your app flows and coming up with a plan according to previous suggestions with the intention of getting this to your users sooner.
We also focused most of our efforts in getting IOS working smoothly, resulting in Android being somewhat neglected. This situation is partly due to our small team managing multiple large projects simultaneously. Naturally, this challenge extends beyond just migration. We should approach each project by considering both platforms from the start, and continuously planning for both. We recommend giving more thought to both platforms when planning the migration. This also ties into the previous point of understanding your app’s workflows and deciding which ones to prioritize first for the transition. Sometimes, depending on your codebase, a workflow that makes sense to start with on iOS might become challenging to implement on Android, or the other way around. When deciding on a flow or a screen you need to consider it on both platforms.
Conclusion
Migrating from a native codebase to React Native was both challenging and rewarding for us. Now, every engineer on our team can handle tasks from requirements gathering to initiating planning and implementation across both the backend and frontend, embracing a true full-stack approach. This migration has granted us greater flexibility, increased our productivity, collaboration, shipping speed all while reducing the cognitive load of every fix and feature implementation.
Resources
Nearform’s multi-part guide is particularly valuable, as it thoroughly addresses many of the challenges we faced and offers in great detail effective approaches and solutions. I unfortunately only found it while writing this post. I think it’s a must read for anyone planning to go through the migration.
- Strangler Fig Pattern for Mobile Apps
- React Native - Integration with Existing Apps
- Nearform - Adding React Native to a Complex App
- Callstack - Migration to React Native
- Agile engine - Migrate to React Native
- Shopify - Migrating Our Largest Mobile App to React Native
- Walmart labs - Electrode
Thanks
A huge thank you to the team at Ejaro for their amazing work, and Omar Bahareth for his support and guidance.
Thanks a lot to Jamon, as well as everyone at Infinite Red for their invaluable insights.